Many of you may have heard about Docker but do not know how to get started. This series will guide you step by step to get it running.
This tutorial focus more about how to use Docker instead of how it works. If you just want to use Docker in your homelab, this is for you.
Why Docker, not virtual machine?
There are many discussions about this topic on the Internet. If you want a detail comparison, this question on StackOverflow is a good read.
For simple, you want to use Docker because it is
- Lightweight
- Easy to deploy and configure
There are many other benefits like it is easy to scale but it does not matter if you use it in a homelab.
Getting Started
Before you start, you need to install Docker. You have to follow the official guide to install Docker. If you are using Windows, I do not recommend you to install it on Window. Most of the containers are made and test for *nix system. Running it on Windows can have unpredictable issues. I recommend running a *nix virtual machine and install Docker on it.
Once you have it installed, you can try the following command.
docker --versionIt should print the version of Docker that you have installed.
Docker version 17.12.0-ce, build c97c6d6Hello World
Let's start by running a basic "Hello World" image.
docker run hello-worldHello from Docker!
This message shows that your installation appears to be working correctly.You just ran docker run hello-world. Let's explain what it means.
docker run means start a container with given image. If the image does not exist, Docker will download it. By default, the standard output of the container will connect to your current shell.
Container is a instance of image. Image is like a blueprint of a system. You started a system with the hello-world blueprint.
Every image has a tag. The format is <repository>/<owner_name>/<image_name>:<tag>. You may wonder why hello-world does not follow the format. Actually all the parts expect <image_name> has a default value. hello-world represent registry-1.docker.io/_/hello-world:latest. _ means it is maintained officially.
Here is some examples.
mysql->registry-1.docker.io/_/mysql:latestpython:3.7-alpine->registry-1.docker.io/_/python:3.7-alpineportainer/portainer->registry-1.docker.io/portainer/portainer:latestdocker.elastic.co/elasticsearch/elasticsearch:6.5.4
Basic Concepts
Here are some basic concepts that you should know before continue.
Port
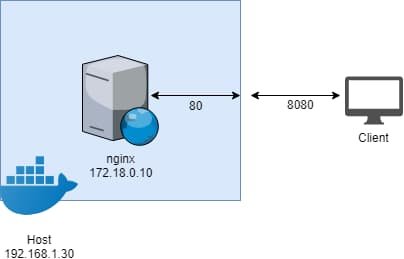
Containers' ports are not exposed by default. This mean even you have a nginx container running and listening on port 80, you cannot access it with <Host_IP>:80.
To expose a port, you need to use -p 8080:80. This represents the container port 80 is expose through your host port 8080.
If you have multiple containers want to use the same port, e.g. all web servers want 80 and 443, then you have to use a reverse proxy like Traefik. I have written a tutorial on how to set it up.
Note that when containers communicate on the same host, they do not need to expose their ports. You can put them in a private network.
Mount
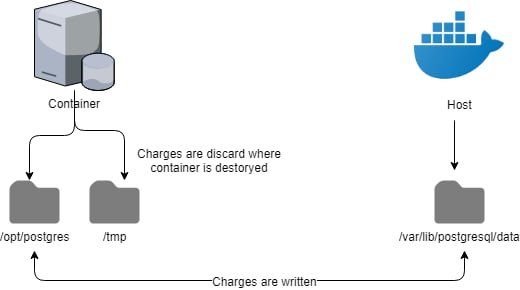
Containers are stateless by default. This means when the containers are destroyed, any changes made are discarded. To persist data, you need to mount a volume.
To mount a volume, you need to use -v /opt/postgres:/var/lib/postgresql/data. This represents /opt/postgres on host is mounted to /var/lib/postgresql/data on container. Anything write to /var/lib/postgresql/data is written /opt/postgres.

In order to make the containers restarted to the same stage, you must know where is the changes are written to. This is usually stated in the readme.
There are also volumes. You can think it is a directory managed by Docker with a given name. For example, you can create a volume call database instead of mount a path yourself.
Environment Variable
It is very common to use environment variables for configuration in Docker. For example, you can initial mysql with MYSQL_ROOT_PASSWORD. To set environment variables, you need -e MYSQL_ROOT_PASSWORD=root.
Note that environment variables are visible to all that can use Docker command. This means if you set API key or password through environment variables, they are security risks. However, you can avoid this by mounting configuration files with least privilege if the image support.
Command
There are some more useful commands that you need to know.
docker ps: It lists all the containers running. You can use-aif you want to include stopped ones.docker run: You can use-dto run the container in background.--nameif you want to give it a specific name instead a random generated one.--pullto force it to pull a new image.docker stop: It stops running containers.docker rm: It remove stopped containers.
Summary
With all the knowledge above, you can get running your services in containers. For example, if you need a MySQL database, you can run
docker run --name some-mysql \
           -e MYSQL_ROOT_PASSWORD=my-secret-pw \
           -v /my/own/datadir:/var/lib/mysql \
           -p 3306:3306 \
           -d \
mysql:5.7
Docker Compose
When you have more and more containers, it is difficult to remember all the containers. You can write down all the commands in shell scripts but it is still hard to maintain. Therefore, Docker Compose comes to recuse.
First, you need to install it. You can follow the official guide on how to install it. Then, you can read the following docker-compose.yml.
version: "3"

services:
  db:
    image: mysql:5.7
    volumes:
      - /my/own/datadir:/var/lib/mysql
    ports:
      - 3306:3306
    environment:
      MYSQL_ROOT_PASSWORD: my-secret-pw
  adminer:
    image: adminer
    ports:
      - 8080:8080
This file describes two containers: db and adminer. The tags should be self-explanatory.
After you create docker-compose.yml, you can run docker-compose up -d. It will does the followings:
- If the configuration is changed, changed containers is destroyed.
- It creates any missing containers. The containers are named as
<directory>_<name>_<number>. If you put the YAML in a directory calleddatabase, then it createsdatabase_db_1anddatabase_adminer_1.
If adminer is the only client that accesses the db, you do not need to expose 3306. Docker Compose will create a default network, i.e. database_default_1, and join all the containers by default. If the containers are in the same network, they can access with the container name and port directly. This means adminer can access db by db:3306.
To destroy all the containers, you run docker-compose down. It does not remove volumes by default.
Single YAML vs multiple YAMLs
When you have many containers, you can put all the configuration in a giant YAML or separate in their own YAML. I have tried both methods but I would recommend one set of applications per YAML.
First, if you put every containers in a single file, you can have name conflicts, like wordpress_database and wiki_database. Does you see why the containers are created with <directory>_<name>_<number>?
Moreover, it is difficult to maintain a YAML file with hundred of lines and the only benefits are you only can run one docker-compose up -d to get all the things running. However, this also means you cannot take down individual application. For example, you cannot stop WordPress without stopping Wikipedia unless you stop every containers individually.
Summary
Now you should be able run any containers you want and convert your Docker command to a docker-compose.yml. Next time, we show examples on how to deploy common used applications in homelab.
Continue in Part 2.

